One of the best things about using a cycle as a form of transport is that there's very little that can go wrong with it without some warning, and with a little knowledge and practice most of those can be fixed - at the roadside if necessary - with a few basic tools and spares. I'm going to talk about some of the tools you might consider carrying with you on your bike, so that you can keep on riding when trouble arises.
This isn't going to be a bike repair tutorial - for that I suggest reading the late Sheldon Brown's excellent website, searching YouTube or enrolling on a cycle maintenance class, such as those offered by Birmingham Bike Foundry. Neither is it a set of product reviews - the items I've mentioned are mainly by way of illustration, rather than specific recommendations, and this article is more than long enough already!
It's all about compromise
Carrying tools and spares on your bike is a trade-off: To be fully prepared for absolutely anything you'd end up carrying nearly a whole spare bike. At the other extreme a non-existent tool kit - while lightweight and admirably cheap - is likely to result in a long walk home for even a minor problem. The trick is finding the right balance.
Mostly, that'll be determined by the type of riding you're doing, the type of bike you're doing it on, and how big a deal not being able to repair it is going to be: If you're only using your bike to nip to the local shops, then you can probably wheel it home if something goes wrong, or maybe lock it up and come back later. If you're commuting on a folding bike, then perhaps the easiest way to deal with a mechanical problem is to fold it up and jump in a taxi. If you're out for a training ride, then you might have a family member who can be called to pick you up in a car, but you risk becoming unpopular if that happens too often. If you're on a solo bike-packing trip in the Welsh mountains or something, you'll need to be a bit more self-sufficient.
The other thing that's going to influence what's worth carrying is what you actually know how to fix. I'd suggest that every cyclist should ideally know how to repair a puncture (even if they usually choose to get someone else to do the dirty work), and that basic brake and gear adjustment are skills that are well worth learning. Beyond that you start needing more advanced (and often bike-specific) knowledge, but in an emergency that might well be available via a phone call or mobile web browser, or even from a passing cyclist, so don't completely discount carrying things that you aren't confident to use. (I once talked a friend through replacing broken spokes as she sheltered from the rain in the doorway of a frustratingly closed bike shop.)
And then there's the big question: What's actually likely to go wrong? While pedals falling off or the frame breaking make for exciting stories, they tend not to happen very often. Realistically, the most common reason for getting the tool kit out is the humble puncture, and these are fairly easy to repair at the roadside. After that, I find that it's usually things that simply need re-adjusting as components wear, or bolts working loose (eg. those securing mudguards or luggage racks). Chain and cable related problems aren't uncommon (though can usually be avoided with good routine maintenance), and although broken spokes shouldn't really happen, some riders seem to get them with tedious regularity. Those - along with lighting failure if you're riding in the dark - are the problems that I'd have in mind while building up a tool kit. Most other failures are either non-repairable at the roadside or appear gradually enough that you can complete the ride before dealing with them.
One kit to fix them all?
Looking for inspiration for this article, I rounded up the various tools and spares that were attached to my bikes and lurking in the depths of various pieces of luggage, and sorted them according to type. The first thing I noticed was that there was a lot of duplication. That makes sense, because when you've got more than one bike, you can either have a single tool kit that works for all of them, and hope you remember to move it across when you use a different bike, or you can have a individual kit with the right items for a each bike, and keep them together. Both approaches are valid, and which works best for you will depend on how similar your bikes are, and how often you tend to use them. (If you only have one bike, you're spared this dilemma, but remember that if you're riding with children, you'll want a kit that fits their bikes too.) I seem to have reached a compromise where two of my bikes have their own dedicated tool kit, and a more generic one is shared between the others.
Spare inner tubes
The second thing I noticed was that I had an unreasonable number of different types of inner tube. It's been said that I'll ride anything as long as it's not a standard road bike, and this inner tube collection would seem to confirm it. Carrying a spare inner tube is an important part of the kit for dealing with punctures: Not only is it easier to swap the tube than it is to patch a hole (especially if it's raining), but sometimes the deflation is due to a problem with the valve itself, and a patch won't help you. If you have more than one size tyre, then you'll definitely need more than one spare tube.
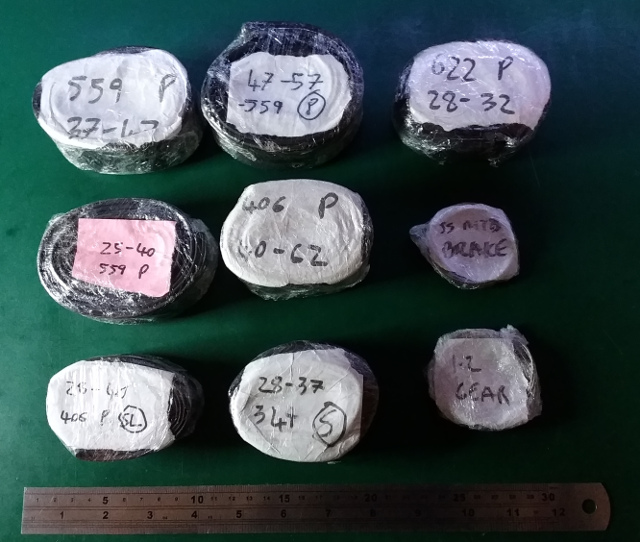
The best way to carry an inner tube is rolled up tightly with some sort of protective bag around it so it doesn't get rubbed as it rattles around in your bike luggage. A friend swears by using his children's outgrown socks for the purpose, but in the absence of those I've settled for wrapping inner tubes in several layers of cling-film, along with (and this is the clever bit) a slip of paper giving the tube's vital statistics in large, friendly letters, so that if you have bikes with different size tyres you don't accidentally pack the wrong one. The same cling-film technique can be applied to spare gear and brake inner cables (bottom right of photo), neatly containing the bare end and preventing it from fraying. Spare cables are lightweight and take up very little space, but depending on the types of brake levers / shifters on your bike, may be a nightmare to replace.
Pumps
A spare inner tube is no use without a pump - the second photo shows my collection:
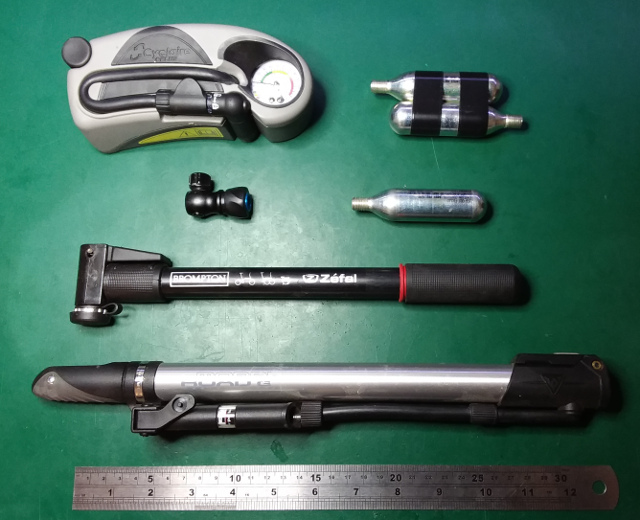
- At the bottom is my favourite, the Topeak Road Morph. This is the type I always recommend to people needing a reliable pump to carry on their bike (I prefer to use a track pump or electric compressor for inflating tyres at home). It's reasonably compact, but has a neat fold-out foot plate so you can push down against the ground, has an easy to work chuck, and a basic in-line pressure gauge so you know when to stop pumping. With the Road Morph it's easy to reach the high pressures needed for road bike tyres. Similar pumps are available from other manufacturers, such as Lezyne and Zefal.
- Above that is the Zefal mini-pump that fits the pump-holder on my Brompton folding bike. Mini-pumps like this require you to hold the pump in one hand while pumping against it with the other, take an awful lot of strokes to fill the tyre and need much more strength to reach high pressures. Also, by directly attaching to the tyre valve rather than using a hose, the pumping motion puts extra stress on the valve, which can break it off and ruin your day if you're not careful. This type of pump is usually the lightest, though, and is perfectly adequate for getting you home should you puncture on a commute.
- Top left is a weird one, the now out-of-production Cyclaire Plus. This works by means of a small piston on a spring-loaded flywheel, operated by a pull cord like you'd find on a petrol-powered lawnmower. With each pull of the cord the piston pumps many times, delivering small puffs of high-pressure air into the tyre, and making a noise like a malfunctioning chainsaw. The great advantage to this design is that it doesn't rely on a traditional pumping action, making it ideal for people with poor arm strength or who have trouble bending over. You can hold the cord in your hand and operate the pump by lifting your arm by the shoulder, or by bending your knees, or whatever. The downside is that it's a lot more mechanically complex than a traditional pump.
- Finally, we have a CO2 inflater chuck and some 16g cylinders of carbon dioxide (taping them together stops them rattling in your bag). This is the lazy (and ultimately more expensive) option. I don't use it that often, but I like to have one available for when it's really cold, or for group rides where I don't want to keep everyone else waiting around while dealing with a puncture. It's also a much faster way to inflate a large mountain bike tyre. The downside to using CO2 is that when you've used your last cartridge, that's it, so you probably want to have at least a mini-pump as well. CO2 inflaters are fairly cheap, and come in both screw-on (which is easy to use) and push-on (which is quicker) varieties.
Puncture repair kit (and other small spares)

Following on from pumps is the puncture repair kit. The one in the photo is from my touring bike, which also contains an assortment of other spares that might come in handy on a multi-day ride a long way from any bike shops. If you're just commuting, you won't want half of this lot (indeed, I carry much smaller kits on my other bikes).
From left to right:
- Puncture patches in a couple of different sizes. Even if you prefer to swap inner tubes, patches are small and will save you if your last spare tube gets punctured. You can get self-adhesive patches, which don't require faffing about with glue, but they don't seem as robust long term.
- A disposable nitrile glove, for keeping oil and grime off your hands. (This used to be a pair, but the other one has wandered off.)
- Speaking of oil, on long tours I carry a small bottle of chain lube. (Not pictured)
- A tube of rubber cement. This tends to dry out after you open it, so I like to buy smaller tubes and replace them with an unopened one after use.
- Chalk - for preventing the repaired tube from sticking to the inside of the tyre.
- Park TB-2 tyre boot - this is for patching larger holes in the tyre that would otherwise leave you stranded if you don't have a spare. Possible improvised alternatives include £5 notes, used toothpaste tubes and duct tape.
- Tyre levers - SJS's steel-reinforced nylon. I also rate the VAR tyre lever for fitting particularly stubborn tyre/rim combinations.
- Sandpaper - for scrubbing mould release and other contaminants from the inner tube before gluing so the patch can stick properly.
- Spare Brake pads (these ones are for the Avid BB7 disc brakes on my touring bike). Very much a touring thing, unless you're doing some serious muddy off-road riding.
- Assorted nuts and bolts to fit things like racks, lights and mudguards. Cleat bolts deserve special mention if you use clipless pedals, as losing one of those can be really annoying.
- Spare chain links - including an SRAM PowerLink which can be fitted to join a chain (and break it again) without special tools.
- Cable ferrules, spoke nipples, spare valve cap - all so small and light that it seems silly not to have them.
- Presta to Schrader valve adaptor - allows Presta-valved tyres to be inflated using the more common car-type pump, should I need to borrow one.
- The special Allen key for the security QR skewers I use - you can't remove the wheels without it.
- A plastic box and ziplock bag that all this will pack into, and a hair tie to hold it shut (these are also quite useful for tying back hair).
Multi-tools and alternatives
Next we have the multi-tools. These are a good way of carrying the assorted Allen keys, small spanners and screwdrivers you're likely to need on a bike - useful for adjusting simple things like saddle height or changing batteries in lights, as well as for more serious repairs. The fasteners used on different bikes can vary a surprising amount, particularly on older ones, so there's no single solution that will work for everyone.

- Top-left is a Crank Brothers M17, which is high quality and a good all-rounder. As well as the usual hex, it has the T25 torx bit that's commonly used on disc brakes, a chain tool, small spanner heads (for things like mudguards), and spoke keys.
- Below that is my current favourite, a Biologic FixKit. This one isn't cheap, but it includes the all-important 15mm spanner for removing non-quick-release wheels, saving a lot of weight. The spanner parts can also be used as tyre levers, and there's a chain tool hidden away in there too. Recommended if you have nutted axles and want to keep things small and light (I carry this one on my folding bike).
- Top middle we have a basic Aldi multi-tool. This doesn't have as many features as the others, but it works well enough, and the slightly longer bits are occasionally handy.
- Finally we have an Aldi 6" adjustable spanner: Fewer and fewer bike components require spanners these days, but it's the thing that most multi-tools lack, so carrying one remains a great way to make friends on group rides. I think this one has seen more action than any of my other tools, though mostly on other people's bikes.
- Also consider the merits of a individual Allen keys / spanners / screwdrivers. On a simple bike, you might only need a couple of tools.
- Notably absent: Those pressed-steel spanners that came with your 1980s Raleigh. These can do the job if there's enough room to manoeuvre, but are best reserved for their nostalgia value unless you particularly enjoy grazed knuckles.
- Conspicuous omissions: Pliers and wire cutters. Both of these are likely to be useful for more serious bodging, but I've not found lightweight ones that I'm happy with. A Leatherman-style general-purpose multitool is a likely contender.
Other useful things
The final photo is the really random stuff, mostly for touring rather than regular riding:

- On the left we have spare batteries in some 7dayshop plastic holders. I'll put in a word for Energiser Ultimate Lithium batteries here - my day-to-day batteries are NiMH rechargeable, but these single-use lithium ones have tremendously long shelf life and weigh much less than regular batteries, as well as performing well in cold conditions; ideal to pack and forget about as spares for emergencies. The other battery box has some AAAs and a basic sewing kit, simply because the box is a good way to contain pins and needles.
- Bottom left we have a head torch - some of my bikes have dynamo lighting, so it's good to have something to see with if you have to stop to fiddle with something - it doesn’t have to be a posh one like this (which mostly gets used for more demanding non-cycling purposes); the keyring LED is the emergency torch from another bike's kit. Something like a Petzl ZIPKA or even a basic pound-shop head torch is ideal, as it leaves both hands free for pumping or fitting tyres.
- Above that is a FiberFix emergency replacement spoke. This is a length of kevlar rope that can be strung between the hub and rim and tensioned to replace a broken spoke if you haven't got a spare. It comes in that little tube rolled up with instructions on how to use it. It's the sort of thing that could really save the day on a road bike with super-lightweight wheels.
- To the right of that is a Park CT-5 mini chain tool. I don't actually carry this one on the bike any more, but it's an excellent tool, and certainly small enough for a touring cyclist to carry.
- Below that is an Aldi Shimano cassette lockring tool (used along with the adjustable spanner). People think I'm daft to lug this around, but with a cassette on one wheel and a Centerlock disc brake on the other, it's needed to get at the spokes on my tourer. This once came in handy when a tandem team I was riding with had their chain come off and get thoroughly jammed between the spokes and sprocket; by taking the whole cassette off, we were able to extract the chain without further damage to the wheel. If you don't have Centerlock brakes to worry about, then the NBT2 avoids the need for a large spanner by using the bike frame itself as a lever.
- On the far right is a toe strap. In the old days people used these to attach their feet to the pedals, but in my opinion that's a dangerous waste of extremely useful toe straps. Securing rolled-up soggy waterproofs to the *outside* of luggage is a favourite application, and they're also handy for turning a farm gate into an improvised work stand, or holding the brake on so the bike doesn't rock around too much on a train.
- And last but not least, at the top we have an assortment of cable ties. With these, a Swiss Army Knife and sufficient duct tape (wrap a couple of metres around a piece of card to make a portable supply), you can bodge pretty much anything!
Final thoughts
Repairs are always best done (and ideally practised with the tools you'd use at the roadside) indoors in the warm, but having the tools and confidence to deal with some of the more likely issues gives you the freedom to ride further without worrying about what might break (this is particularly important to me, as I have knee problems which limit my ability to just get off and walk, and don't have a car-owner at home to come and rescue me). Most tools don't have to be expensive to work well, either, as with most cycling products, beyond a certain point you pay a hefty premium for reduced weight, rather than higher quality.
I also haven't touched on the things that might go wrong with the bike's engine. Depending on how epic your ride is going to be, you might also consider carrying a basic first aid kit, some food and water, extra clothing, tissues, a survival blanket, painkillers, allergy medication, etc. Cycling is a pretty safe activity, but longer rides do tend to expose you to unpredictable weather, angry insects and the like.